Pythia's Hat

This blog is mainly about Telescope making, and some things about my politics. At last we finally have a President that can say "Fool me once; shame on you. Fool me twice; shame on me." instead of mixing up with an old Who song.

Saturday, January 23, 2010

Blood Snot and Tears


No blood letting yet.

It was bloody cold in my shop today, but I got out there anyway. My nose was running and I dripped a little on the wood which swelled up. Yeah, I know... TMI. I have to get a heater out there that doesn't create CO and poison the air.

I have had some really bad back problems lately and have been going to a physical therapist and its really helping. But I was standing too long on the concrete floor of my shed I guess and now I can hardly move. There's the tears.

Despite this, Susan and I are going up to Phoenix and Dragon bookstore in a few minutes and then go on up to Mehan's Irish Pub up on Hammond Drive in Roswell to see our favorite band Emerald Rose play there tonight.

And as usual here are the photo's of what I am doing. This is the box that surrounds the mirror cell and mirror. Its just taped together with masking tape at this point as a dry fit, but really I couldn't stand it anymore out there and came back into the house early.


DSC02813

DSC02815

DSC02809

Monday, January 18, 2010

I can honestly say I have begun making the telescope

Here are some more shots about what I have been doing lately with my telescope. Basically, I've decided to make the octagonal box that the mirror goes in first, and build everything else that goes around it based on that.

This is the mirror cell on the bottom of what will be the octagonal box that the mirror will sit in. I've tried to show here in these pictures how the cell is very adjustable from around 6 degrees all around the center op[tical axis.


In this second shot it shows how much this cell can be adjusted. It would never get that far in reality, but its pretty flexible.


Here, I have trued all the adjustment screws up so that you can see it as it will eventually rest. This is closer to reality. Note the allen wrench on the left adjustment bolt.


Isometric view of it. The adjustment screws are held fast to the board with brass threaded inserts. The ones I found have a fairly fine thread that matched the plys in the baltic birch.


This final shot is a cut-away drawing of what it will look like when finished. the blue transparent thing is the mirror, and beneath it is the cell. Both are surrounded by the octagonal mirror box.

Monday, December 28, 2009

Mirror cell glue up


Here is the mirror resting on the cell.
A top view of it. The larger holes at the two ends of the bar that holds the rocker are for the top adjustment bolts. The single bottom adjustment bold is attached through the large hole centered on the back bar from underneath.
Another shot of it showing the four mounting pads. The lower two are on the rocker bar so that the weight is evenly distributed on a three point system.
Here is the underside of where the sling posts are. Glued on 1/32" sheet aluminum gussets there and on all the joints top and bottom.
One of the posts that contains the mounting points.
Here is the single rocker bar. That's two t-nuts attached to it. Its made of 3/4"

Thursday, December 24, 2009

Christmas Eve in Santa's Workshop

It's Christmas Eve, and ever since I found the Santa hat in our decorations the other day, I have been wearing it. It's been kind of cool lately and the new workshop needs to be a little warmer. It's all insulated, so when it gets warm, it stays that way. But I have to heat it with a little propane heater, and with no ventilation, I have to leave the door open a crack and pretend its not hurting me.

I have been very busy lately doing the final drawings for the telescope and actually cutting and assembling the parts for the rig that holds the main mirror (the mirror cell in ATM parlance). I have become a huge fan of J-B Weld epoxy. When the design I made called for a screw that no one actually makes, I made one from a small socket head screw (for the head) a 3/4" piece of brass tube and some 5/16"-18 threaded rod. Strong like bull.

The rest of the design is simply 1" square aluminum tubing that I cut with the table saw and a newly sharpened carbide blade.

I made up a gluing jig from some wood scraps I had laying around and clamped it all together with the J-B Weld.

We have to go out in a little while to Dave and Emily's. Their boys got a little Tasco telescope for Christmas and they want me to tell them how to use it....... "First, get a clear night"... Dark and stormy here today and tomorrow.

Anyway, to the pictures.
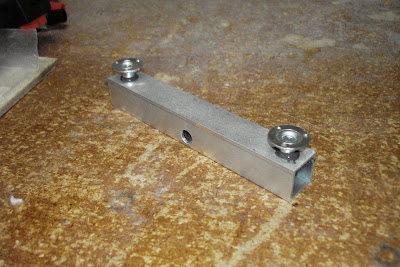
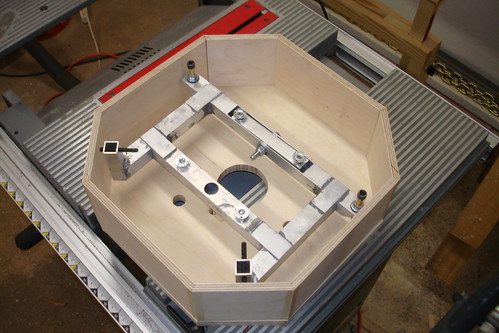
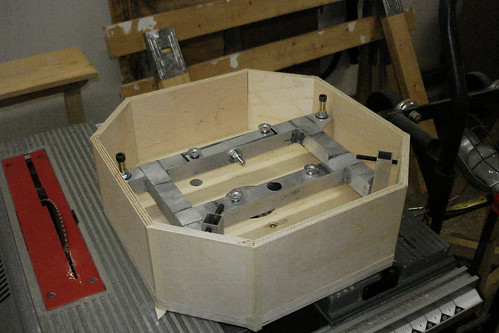
This is the crossbar. Without getting into a lot of detail, these are two of the four points for the flotation system. Those are t-nuts held on with 1/2" hex bolts cut down to fit and glued with J-B Weld.


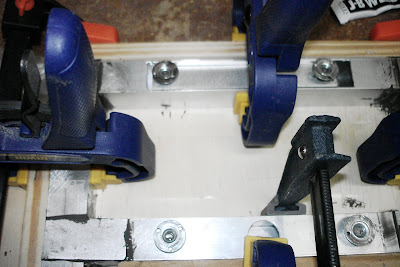
Here it is at the top inserted into its slot. The rest of the parts are all clamped and glued into place on the jig.


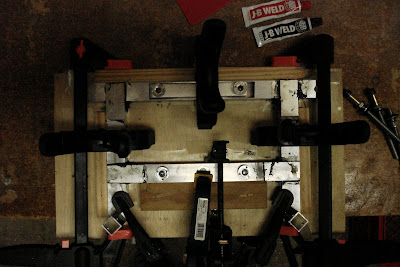
Here is the top shot of the cell in the jig. to the right are the adjustment screws I made.
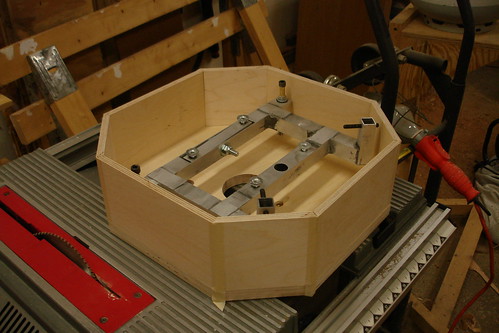


From the side.


Here are the three adjustment screws. A short 5/16"-18 x 1/2" socket head cap screw glued into one end of a 3/4" long brass tube. Into the other end is threaded rod. This gives a short shank under the head. Everything else available anywhere only had 1 1/2" of thread. (I looked in McMaster-Carr, Small Parts, and even the old fashioned Handy Ace hardware in Tucker (if its made, they have one). No one had a fully threaded 3 1/2" x 5/16" socket head cap screw or even a hex head bolt. Not even something close in metric. Had to make my own. I had problems getting the barrel, screw and rod lined up while the glue set. I'm still not satisfied. I will likely ask my ATM buddies for ideas.


Next time, the finished cell!

Thursday, November 26, 2009

Back to Telescopes

I've finally finished up most of what I need to do to my shed. I've torn down and replaced three walls, moved the rafters up a foot, put on a brand new door, insulated it and put 1/2" plywood throughout. White paint inside makes it a lot easier to see things. And oh yeah, I rewired it and put in lots of lighting. I can honestly say I've made a pretty good woodworking shop. It took me a year, and I still need to put the final siding on the outside before it comes unglued. But hey, its my Man Cave, and I like it.

Now that I have it, and I won't freeze in the winter with cold air whistling through every time a MARTA bus rolls by, I can actually finish off my telescope.

I've had a lot of designs that I have been mulling over, but I became smitten with a really simple design that Ross Sackett came up with. I emailed him about my version and he seems to think it is quite doable and gave me a few suggestions on how to do it right and what pitfalls not to fall into.

Anyway I have a really cool photorealistic rendering engine for SketchUp installed on my computer now so here is a picture of what mine will look like.


Sure, it doesn't look like a traditional telescope. Its an open design with barely enough there to allow it to point anywhere and hold the optics in place.

So, that's what I've been up to lately.

Happy Thanksgiving!

Thursday, May 14, 2009

Mita's Graduation

Long time coming with a new post.  Been busy with rebuilding my shed and outfitting it for woodworking.  But something really important came up Monday.My niece, Anne Genevieve (we call her Mita) graduated from her Ph.D. program at Emory University.  My brother Bob, me and my wife Susan were there as surrogates for her parents who couldn't make it up from Mexico.  Here is a video and some pictures.
We are so proud of her.  Mita is going to be working at the CDC next door.


We were in the center of the balcony in Schwartz Hall (huge pipe organ there, geez)
here they are walking in.  There was a guy that played the bag pipes - Emory's Alma Mater I gather.  Sounded a little like "My Darling Clementine" and the old Balintine Beer jingle about the three rings.


The Dean kept it short and sweet.


Sitting in the back row.  There was a short row behind and to her right that the stragglers trouped off to.


And waiting and waiting and waiting.  Must have seemed an eternity.


Hooded, looking smug, finally.  Great seat for a fast getaway.


More pictures soon.  I finally gave up on Picassa and started a Flikr account like everyone else in the family.


Saturday, January 31, 2009

Reflective Break

Ok, so it kind of got cold this past fall and then Christmas and New Years and then all the other stuff, politics-wise. And I ran out of polish anyway (got some more now though). And a huge bill on my truck has pretty much left me in the design phase again.

So I've promised myself and several friends, that I would be starting out with a Steam Punk telescope. Cherry, brass, inlay, carving, maybe some leather and gold leaf (! right). I saw some nice minimalist designs that I liked, Jan vanGestal's 30cm in the Netherlands has a really simple 6pt mirror cell, I am designing a similar 4pt one. Another guy named Tim Nott in Australia, has a 16" tri-dob that he did a great job on, and I was seriously considering it too. It's a truss type OTA, but also liked the Pletestone cantelevered design. no links to that anymore :(. And before all that I saw a really nice design "Captain Nemo" by Anthropologist Ross Sackett. Featuring beautiful wood, brass, inlay, metalwork, and even gears and chains, its a marvel to look at and an inspiration, and I said "someday".

I went about scratching around other designs, like this partially completed one:
(click to enlarge them) It has a very open structure. In fact, the mirror is just laying there on its four points beneath it, and two on the side (against which it rests when you tip the whole thing away). It would work fine, but its kind of unsafe for several reasons. Most importantly, its a magnifying mirror. That means if I leave it out in the sun during the day it could blind someone passing by or start a fire very easily - even without a reflective coating. Also, it could get damaged by a stick falling from a nearby tree, or sand kicked up. Being so open like that has the nice feature of being very light weight though. But it has lots of very odd angles to it, and frankly, I am not up to the task of getting those very well, so early in my wood working experience.


But it gave me some good ideas. First, its a tri-dob. I like that. It mans that the mirror and the telescope above it sit in the middle of a triangle which is very stable and low to the ground. Also the two cresents are smaller than a traditional Dobsonian, and there is a center one of bigger diameter under the mirror. If I ever wanted to motorize it, then all I would have to drive would be that center rocker, and not two outer ones. The secondary mirror holder would have been a wire spider like Jan vanGestal uses.

This led to another one that is more enclosed version of the same thing. here is what the mirror box part of it would have looked like:


I threw some nice cad formatting in there to see what it would look like. Basically its 1/4" plywood bottom, top and sides. The three crescents are the same though. This design would be really easy to put a flip up cover so that the mirror would be protected when not in use. Popping the mirror out would be simply a matter of lifting it out with a little cradle tool so that I could store it in its storage box. I really liked this design. But again, its beyond my ability. All that curved wood is made by laminating and building up my own thick plywood from thinner plywood. I could do it after a few prototypes, but I have no experience with that, and it would look like crap with all kinds of compromises and rationalizations on my part before I got done. The other thing with this is the trusses. While they make the assembly very stiff (just like my mirror grinding stand in previous posts here), they are hard to put together right. This wouldn't be the case if I could simply put it together and leave it, but I want this thing to be portable, so they have to be easily disassembled each night. Making the hardware that will let you do that, and still be strong enough would be a difficult undertaking. Six truss poles is better than eight of them, but not by much. I made that design with TurboCad drawing software if you are curious. Fun stuff.

So, I went back to the drawing board - virtually - and decided that I needed to re-learn a lot of things that I haven't had to use since I was a college kid at GT. Things like stress, strain, elasticity, tension, compression, beams, moments of inertia, moments of insanity. What I really wanted was something that was strong enough, and stiff enough not to act like an archers bow every time I touched it. What it looked like afterwards could be 'art' if it looked wierd, or 'design' if I could make form follow function. Basically, a statement of excentricity - my favorite thing!

Then I looked on my Barack Obama calendar and there for January 30 is a quote by Nelson Mandela. - "There is no passion to be found in playing small - in settling for a life that is less than the one you are capable of living". Ok, so that clinched it. Back to the Steam Punk telescope, just do it.

Looking for inspiration I checked back at Ross' website and saw that he had updated it to include other designs I was unaware of. He also had some engineering pages that confirmed a lot of what I was discovering, and I became convinced that his "Moonsilver" series of scopes were simple enough and customizable enough that they fit right into what I was thinking.

So, my aim is to make a telescope that looks something like these images. I made them with Google Sketchup. Its a free program that really helps in visualizing what you want to make, and it allows you to make sure that all the moving parts won't knock into each other. Here is my interpretation. Or you can actually download the sketchup files and use them yourself. (they are copyrighted by me, so ask before taking. I'm into open source, so they are copyrighted so as to maintain that. contact me for details). Anyway, here is a link to the .skp file. http://sketchup.google.com/3dwarehouse/details?mid=414cd6f6aac16df818f475bed8b50d3
A view from the rear-side. This is what it would look like as you walk up to it. the eyepiece is in the brown thing at top left. That is connected to the base by a bent aluminum pole. Its bent so you back won't be.


Viewed from the other side - front side. the black circle is a light baffle that leaves the optical train unencumbered. It is mounted on its own smaller tube and is easily removable if its not needed for the night - like up in the north Georgia woods. Here in Atlanta, though, its needed, as there are too many street lights near my house.


Looking at it from the front. The diagonal mirror is held by a single curved piece of 1/8" aluminum. I might make that brass, and carve it :) What I don't show here is the lid for the mirror box.... details, details.


From the left. Here you can see the single crescent
(instead of three with the other design), and the attachment arm between the pivot point and the mirror box. This arm has attached to it the large 2.5" bent aluminum strut tube. The smaller bent 1/2" tube for the light baffle is attached to the end of the crescent. This is probably not a great idea, and I amy change that. The holes in the cresent do two things. they make it lighter with no loss in strength, and they make it look cool. Probably need some inlay here.


A view from the back. The septgonal mirror box
will have mirror columnation and safety screws in the bottom of it to adjust the mirror with.
One thing to note here is the two platforms at the bottom. The top of them has a 16 gauge steel plate attached to it for smoothness. It rides on the bottom one with roller bearings. I haven't decided how exactly yet. But it has plenty of room if I want to motorize it.

A view frm the right. Here, the vertical arm with the pivot point in it (a 3/8" bolt) rests on the base. At the end of the pivot arm is a carving like on a fiddle head or old time battering ram!


A view from the top. As you can see the base
rings are just that, rings. I may change that, because I probably need a vertical pivot point. But maybe not.

Again, you can see some holes, this time in the mirror box. Same reason.