This blog is mainly about Telescope making, and some things about my politics. At last we finally have a President that can say "Fool me once; shame on you. Fool me twice; shame on me." instead of mixing up with an old Who song.

Saturday, May 31, 2008

Prep work and other things

I haven't been grinding away at my mirror lately. The way I left it was that I had a form built to pour a tool, but I hadn't decided what to use for the medium. And then Memorial Day weekend intervened with a camp out in the mountains, and a new radiator for my truck, and a budget that tanked for the month. Oy. But I did manage to read up more on things I need to know and other things I don't need to know but am interested in for making my telescope. Unfortunately I won't have much time to work on it for a few weeks, as I have been told by boss that all of our IT certifications are expiring within the next 90 days, and I have to get re-certified or risk loosing our IBM Premium Partnership deal. Yes, I am one of those IT geeks. Geekier than most, since I do Lotus Domino, and not many people do that, and I actually know what I'm doing. Unfortunately, I hate taking tests, and I haven't been certified since two versions back, so I have to start all over again... And I really hate it when I miss a question on the tests :( So I have to get some prep exams and take them over and over again until I pass, and then I go in and take the test. Then I can let it slide for another couple of versions :)

There has been some discussion on the ATMList mailing list that I have been monitoring about diagonal assemblies. For those that don't know, a Newtonian telescope, the kind I am making, has two mirrors, the big one at the bottom of the tube, and the small one at the top of the tube near the eyepiece. That small one is known as a secondary mirror or the diagonal mirror (or both) and it diverts the reflection of the star from the center of the big tube to the edge where the eyepiece can get to it. There are as may ways of making sure that the diagonal stays in one spot (or not) as there are telescope makers. But people on the ATMList share a lot of ideas. On sacrosanct rule is to make the support for it tiny so that it doesn't block too much light as it enters the scope, but make it stiff enough to do the job. To that end, an idea of using thin wires, guitar strings, and arranging them like guy wires on an old fashioned airplane. Its simple, can be made really stiff, and it's light weight, and I won't have to cut any sheet metal and keep it flat at the same time. The hard part will be making the attachment points for the ends of the wires. I don't want it to look like something I cooked up in my shed. I'll think of something though.

The other discussion I was interested in was how to hold the big mirror. There are elaborate designs out there with little closely spaced triangles of metal each supporting a small area of the back of the mirror so it doesn't flex however minuscule. But they are hard to make, and according to engineering analysis tools I've used, they don't do much more for me that a 6 point design. My mirror is 12.5 inches across, and 2.1 thick, so its not going to flex very much anyway. But even if it were 1.5 inches thick it would still make sense to use the 6 point design.

Here is an image of the design I plan on making. It's made of 1/2 inch 6061 aluminum that is easily found on EBay for under $20. The drawing shows the cutting diagram that the machine shop will need to cut it with their water jet cutter.
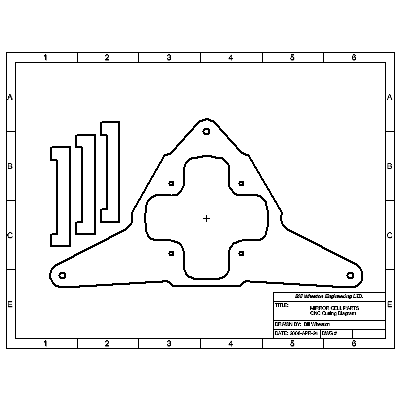
6 point mirror cell CNC cutting diagram for 12.5 inch mirrorHe said he would charge me $25 to do that part. Most of that would be setup time, and that once he started cutting, it could be way more complicated than the lines I have drawn here. There are three little bars, and the main piece. The central opening is big enough to attach a little muffin fan for cooling the mirror should I desire. The bars attach diagonally on the two sides and at the bottom. 6 point mirror cell assembly for 12.5 inch mirrorThe mirror lays on top of the bars, and is held there with RTV. One thing to note is that the adjustment screws located at the corners of the triangle are not evenly located around the central opening. That is because they form a right triangle which I think will be more intuitive to use when adjusting the telescope's alignment. Here is another image of the assembly so that you can see how the bars attach with one screw each. The bars pivot, however minutely around those screws. The ends of the bars will actually have 3/4 inch round metal pad attached to them made from welding nuts. That will give a bigger surface for the RTV. I'll post more pictures when I actually finish this sucker.

Sunday, May 11, 2008

50 years

Yep, that's right, yesterday I turned 50. We had a party at our house. Those with kids brought them, and played badmitton (or something like it.) The rest of us had barbeque from a great barbeque/blues joint in Decatur called "Maddy's" -- real live hole in the wall with the best food and blues in the country. My brother and his wife, their son and his wife and kid, and my eldest neice and friends from as far back as the mid 70's came by, and my neighbors all around. Loads of fun. My brother and his wife called from Mexico where they retired for a while. (BTW Tom, I checked, and I was born on a Saturday, so nananbooboo.) The weather held and we just sat out in the yard until 9:30 or so when we packed it all up and went in. My neice stayed until nearly midnight chatting away. I got everything from a marshmellow gun, (2!) to some nifty lamps from Ikea, to new Spanish language learning CDs (my other new years resolution besides making a telescope is learning Spanish) to a great bottle of rum, scotch, belgian beer, and a lava lamp!

Much good beer, much good scotch. Had I known that's how you aquired such things I would have had more parties over the years!

Over night it rained like to beat the band. Several thunder storms rolled through, and in all the excitement I forgot to put the tarp over the rented tables and chairs, and left may car window open. Fortunately it has been windy today... very windy... gusts up to 25 or 30 mph, and normally around 12 mph all day long. It was very wierd, and reminded me of growing up on Long Island Sound where that is fairly normal.

After all the clean up, I finally got some quality grinding time in. And I made some videos about what I was attempting to do and why. Here are some links to them.


Thursday, May 08, 2008

Mirror Grinding Log

Here is my log of activity lately with my mirror grinding progress. As I update it, this should change. I use google docs to do it, and then put it into an iFrame


Saturday, May 03, 2008

A hogging we will go

I've always loved hardware stores from the time I was 8, going down to Katz's hardware store with my brother to get glass to replace windows he broke while throwing shoes at me. No ordinary glass, mind you. This was 250 year old hand blown glass in our 250 year old house in Connecticut. My mother was in tears every time one broke, poor old girl. But what did we know? Years later Mr. Katz bought a parsel from the people we sold the house to and built a house behind it. I sure wish I still lived there -- full stone foundation basement.

Well, I got all the final questions I had answered on the ATMList.net newsgroup, about making my mirror a little deeper. Today is Saturday, and I started it out by making coffee, doing the dishes, washing the water bottles with the closable lids I've been saving, and filling them with the grits that I got from GotGrit.com. I put everything except for the #80 and the #60 grit into these little squirt bottles. Here is a tip... The really fine WAO grits pack down so hard in the paper funnel I made, that they simply would not make their way into the bottles. So do this, use a shish-ka-bob skewer. I have metal ones, but the bamboo ones would work too. Push it down into the paper funnel into the bottle and twirl it around to re-create the opening through the funnel. Keep doing that until it all goes into the bottle, and then rattle the skewer around in the funnel to get any remainder. Then add the water to the bottle. I did this from my tap which is filtered. I made sure to let the filter run a little bit to make sure that it didn't have any extra grit of its own that it wanted to add. There were several bottles. The ones I'm not going to use for a while I put up in a shopping bag near my beer making supplies in the house where its a lot cleaner than the shed. I figure that when I need them I'll take them out, one by one. There will be a lot less chance of contamination that way. After walking our gods Dave and Max, and smelling the first of what is promising to be a spectacular rose season, I set about my grind -- "hogging out". It's called that because after a while in the heat, you smell like a hog... either that, or you have to be as big as a hog to get the job done. It's a lot of hard sweaty work to scrape all that glass away.

Before I started, I measured the sagitta with my nifty new digital dial indicator that I got at the disposable tool store, and it said 0.097 inches. That is about as close to a 101" f/8 as I would even hope for if I were to try it. Paul, the guy I bought it from did that, 40 years ago this year. And that is where I started from. I really hated to mess up the work he did. Honestly, one of the reasons it has taken so long for me to start was that I wanted to make sure I was going to do it. A number of times I hesitated and thought, "Do I really want do this to a perfectly good f/8 mirror?" But in the end, I did. Plop down a teaspoon of #80, dribble some water from an old milk jug, and start rubbing... crunch, crunch crunch. What a noise!

Yesterday I bought a 2 inch pipe cap to grind with. To make the end cap fit better on the glass, I ran it past my belt sander to make it flat. That took most of the zink galvinizing off of it. I used that to grind with for about 25 minutes and measured the sagitta. It was at .1005 inches, and I realized that it was going to take me forever with the pipe cap. I took Mel Bartels tip about a 3" pipe flange, so it was off to Intown Ace Hardware. It seems that pipe fittings, like every other cheap thing is made in China these days, so I got two, and a 3/4" close nipple to go between them, so I would have something to hang onto. A spray bottle finished up the array of things I needed (I told the hardware gal it was for cat herding, and she completely understood, and had suggestions of her own. I kept having thoughts about "Cat People"). The thing about pipe flanges is that some are flat on the bottom, and others are ribbed. I got the 3" one with the 3/4" thread because it was flat on the bottom, and it was just about 1/4 the size of my mirror. I took the belt sander to it too, and restared grinding.

18 minutes with three re-charges, then 9 with 2, then 20 minutes with 3 more. Sweat dripping from my brow now, because the shed was in full by this time, and the rain clouds had cleared. I cleaned up and measured the sagitta again. It was 0.113 inches, and I started thinking, "Hey! those guys were right, I might actually get done with this in one weekend (were it not for the honey doos). So I took my nice new mirror testing stand out into the yard and put the cleaned up mirror on it and doused it with some water from the cat torture device, and presto, an image of the sun on my shed. I measured it out, and the focal length was now sitting at 76 inches.

Way cool! All the work I was doing was going in the right direction! I went from 101" to 76" in a little over 73 minutes. Sheesh, at that rate, I better start paying closer attention to how much I am grinding, since I am aiming at 68.75 inches. So, as far as I can tell, my target sagitta is 0.141 or so, so I have .028 inches to go, and that's not all that much. Another hour, and I should be pretty close to the point where I have to make the tile tool. BTW, in the middle of all this I made a little radius template using a large compass I made. I had a 1/2" x 1' x 8' piece of plywood a attached to a short 2x4 with a nail as a pivot. The plywood was too short, so I clamped a longer 2x4 scrap to it. To that, I clamped a 1/4 inch square iron rod I sharpened into a knife at the radius. Then I took some aluminum flashing I had laying about and nailed it to a board with some matt board in between, and scored the flashing at the radius I wanted. Then simply bending it at that radius broke the aluminum at the point I wanted, and now I have a little radius tester tool for rough checking.

Anyway, I wasn't so sure I was doing this whole "Hogging Out" thing right, so I decided to make a little movie with my camera. 'sideways because I don't really have a tripod, so I had it clamped to my drill press table. So have a look, but you will have to turn your head to the side. It's my first attempt at uploading to YouTube, so I'll try to do better next time. Anyway, it's here:


-Bill